OLD DRAGONFLY TRIMARANS USER FORUM 2001-2006
DF920 Equipment
These are archived postings from the first Dragonfly User Forum from 2001-2006. Lots of useful information to be found here!
Here you will find all the information about the Dragonfly 920’s Equipment.
To jump straight to a category on this page click on any of the words listed below
Anchor | Autopilot | Wallas Diesel Cooker | Winches
| Cover for Wallas diesel cooker ? |
| [from: Malcolm Ratcliffe, United Kingdom, 28 Apr 2005] |
|
I have the Wallas diesel cooker on my boat, and wonder if anyone has found or made a cover for it? When you switch off, the ceramic top remains hot for ages, and I am concerned that someone coming down into the saloon could easily put their hand on it to steady themselves. I have checked with Wallas, and they do not make a cover. On many caravan cookers, they have a toughened glass cover with sprung hinges, that will keep the cover in the vertical position as well as the horizontal. I am trying caravan breakers, but have had no luck so far. Any ideas? Mal |
|
|
| Sheave Box in Coaming |
| [from: Malcolm Ratcliffe, United Kingdom, 2 Sep 2004] |
| The float outhaul & inhaul lines come to the winch via sheaves in a stainless steel box recessed into the cockpit coaming. I have a jammed sheave one side, and a cracked one the other side. How do you replace the sheaves? Do the pop-rivets that fix the sheave-box to the GRP coaming have to be drilled out first, so that the whole box comes out complete with sheaves? Can the sheaves then be removed from the sheave box? Anybody done it? |
|
|
| Re: Fresh Water pipe maintenance |
| [Larry, United States, 27 Aug 2004] |
|
There were some messages in the DF-920 section about green growth in water pipes, and I think the following would be helpful to all boat owners… It was posted online elsewhere by Peggie Hall who wrote a book called “Get Rid of Boat Odors” (buy online here http://shop.sailboatowners.com). I have no relation to Peggie or financial interest in the book, but I own a copy and recommend it. I’m sure she’d appreciate being quoted along with the link to her book. Her text follows: FRESH WATER MAINTENANCE Fresh water system problems–foul odor or taste–are typically caused by allowing water to stagnate in the tank and especially the lines, creating the ideal environment for molds, fungi and bacteria that thrive in damp dark places. Here’s the recommended method for recommissioning fresh water systems; this should be done at least annually: Fill the water tank with a solution of 1 cup (8 oz) of household bleach per 10 gallon tank capacity. Turn on every faucet on the boat (including a deck wash if you have one), and allow the water to run until what’s coming out smells strongly of bleach. Turn off the faucets, but leave the system pressurized so the solution remains in the lines. Let stand overnight–at least 8 hours–but NO LONGER THAN 24 hours. Drain through every faucet on the boat (and if you haven’t done this in a while, it’s a good idea to remove any diffusion screens from the faucets, ‘cuz what’s likely to come out will clog them). Fill the tank again with fresh water only, drain again through every faucet on the boat, repeating till the water runs clean and smells and tastes clean. Remember: cleaning out the tank addresses only the least of the problem…most of the problem occurs in the lines, so it’s very important to leave the system pressurized while the bleach solution is in the tank to keep the solution in the lines too. People have expressed concern about using this method to recommission aluminum tanks. While bleach (chlorine) IS corrosive, the effect of an annual or semi-annual “shock treatment” is negligible compared to the cumulative effect of holding chlorinated city water in the tank for years. Nevertheless, it’s a good idea to mix the total amount of bleach in a few gallons of water before putting it into either a stainless or aluminum tank. People have also expressed concern about the potential damage to rubber and neoprene water pump parts. Again-the cumulative effect of carrying chlorinated water is more damaging than the occasional “shock treatment.” Occasionally, a water pump has been known to fail immediately after recommissioning, but it’s always been an older pump in which the diaphragm and/or valve were already “on their last legs” and would have failed soon anyway. Far better to “push it over the edge” during spring recommissioning than have it fail a month later at sea with no replacement parts aboard. To keep the water system cleaner longer, use your fresh water…keep water flowing through system. The molds, fungi, and bacteria only start to grow in hoses that aren’t being used. Before filling the tank each time, always let the dock water run for at least 15 minutes first…the same critters that like the lines on your boat LOVE the dock supply line and your hose that sit in the warm sun, and you don’t want to transfer water that’s been sitting in the dock supply line to your boat’s system. So let the water run long enough to flush out all the water that’s been standing in them so that what goes into your boat is coming straight from the water main. Finally, while the molds, fungi and bacteria in onboard water systems here in the US may not be pleasant, we’re dealing only with aesthetics…water purity isn’t an issue here–or in most developed nations…the water supply has already been purified (unless you’re using well-water). However, when cruising out of the country, it’s a good idea to know what you’re putting in your tanks…and if you’re in any doubt, boil all water that’s to be drunk or used to wash dishes, and/or treat each tankful to purify. It’s even more important in these areas to let the water run before putting it in the tank-wash the boat, whatever it takes…’cuz any harmful bacteria will REALLY proliferate in water hoses left sitting on the dock. |
|
|
| Re: DF920 deck organiser replacements / main sail battens? |
| [Larry, United States, 23 Aug 2004] |
|
Malcom — Your batten did split, and in my opinion it should ideally be replaced. You could also try a repair, by soaking the brush-like end in epoxy and wrapping it tightly in shrink tubing or tape until it sets hard. I don’t know why it split, but would guess it wasn’t fully inserted in the batten car socket and was damaged in gybing. Your batten adjustment screws should be set so that the battens can’t move in/out of the sockets freely. |
|
|
| Re: DF920 deck organiser replacements / main sail battens? |
| [from: Malcolm Ratcliffe, United Kingdom, 20 Aug 2004] |
|
Following my earlier posting, I have spoken to Quornings, and they say that the deck organiser is Fredriksen. It was originally thought that the sheave for the mainsail halyard should be roller bearing, as the delrin ball type would not take the load. However, the roller bearing types are not taking the load either, so Quornings now use a plain bearing. Anyone any thoughts on my earlier question regarding the mainsail battens? |
|
|
| DF920 deck organiser replacements / main sail battens? |
| [from: Malcolm Ratcliffe, United Kingdom, 13 Aug 2004] |
|
Does anybody know who the manufacturer of the 4 sheave deck organiser is on the 920. (Mine is no 34, October 1998) The sheave bearing has failed on the main halyard. I notice that the other three sheaves in the organiser have Delrin ball bearings, but the one that has failed has an aluminium sheave, and what looks like the remnants of roller bearings. Was that original, or has someone already changed from ball to roller? Also, looking at the battens in the mainsail: looking up, where the three lower battens insert into the plastic cup fitting attached to the Fredriksen ball car, I thought at first that the batten was snapped, as there is an angle between the batten and the fitting. However, closer examination shows that the end of the batten is split, so that it almost looks like a brush. It is white bare glass, whereas the rest of the batten is finished shiny black. The leech (outboard) end of the batten is large diameter, and the inner third (luff end) is a smaller diameter rod glued/inserted into the larger bit. I assume that this is to ensure more of a curve in the forward part of the sail. However, the smaller diameter looks too loose a fit in the batten car fitting cup, and I wonder if this has contributed to the white end bit splitting into many strands. What is the cure, do I have to buy entirely new battens, or can the forward thinner rods be replaced and somehow glued into the thicker main batten? |
|
|
| Re: Water pipe cleaning/replacement |
| [from: Bo Wetzel, 13 Aug 2004] |
|
A good methode to get rid of green algae (which works like a dream for swimming pools) is to use copper sulfate . The recommended dosage for pools is 1-2gramm/1000litre. So, if you use 0.25 gramm for a tankfull of water (60l) it should kill all your algae. You need to disolve the copper sulfate well in warm water before adding it to your tank, then fill your tank and pump it well into all the pipes. After 1 day pump a good quantity through the pipes, leave if for another day or two and then empty your tank by pumping it out through the pipes infected by algea, which should be dead by now and rince all several times (!) with clean water. I you spill any of the copper sulfate solution clean it immediately with lots of water, as it will stain things blue. (Sorry John, but you should have asked first, before starting to dismantle your pipes. However, it might be helpful to others!) |
|
|
| Water pipe replacement |
| [from: John Blaiklock, UK, 4 Aug 2004] |
|
My water pipes from my tank to the toilet and washbasin have green algae growing in them making the water taste bad. No chemical cleaner has solved this, so I need to replace the pipes. There are 4 sections… Kitchen tap to foot pump, easy to replace. Foot pump to 3-way connector next to bilge pump under the main cabin floor inspection hatch, easy to replace once the cable tie is removed (see later). 3-way connector to water tank skin fitting running under the toilet floor and forward berth, more difficult to replace because of a cable tie (see later) 3-way connector to the toilet washbasin tap. This goes through a moulded channel up the bulkhead/hull side. I have not been able to get the old pipe out, and if I did I don’t think I could get a new one in. Does anyone know how to replace the last pipe section without a considerable destructive dismantling of the toilet compartment? Cable ties: In places, like under the main cabin floor and under the toilet floor, the various pipes are held together with cable ties. These cannot be seen, only felt. They must have been put in place before the floor was fitted in place. They make pipe replacement very difficult. They need cutting before the old pipe can be removed. This has to done blind at arm’s length. This is not a good design feature as it makes pipe replacement very difficult. It is not possible to replace these cable ties so i have left them out. The pipes do not have much room to move about anyway. |
|
|
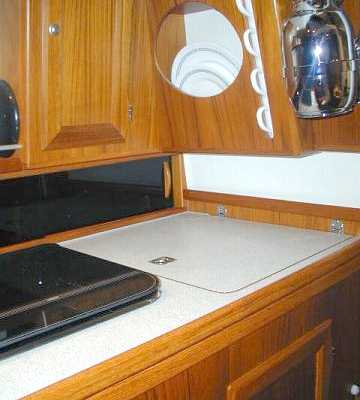
| Cooker/heater – no gas |
| [from: Bo Wetzel] |
| Hello Bill, sorry I haven’t got detailed information on the parafin version of the Wallas cooker but I think it might be similar to the Wallas diesel cooker. I’ve prepared a sepcial page for this one which you find here: Important Notes on the use and servicing of the WALLAS Diesel Cooker |
|
|
| Cooker/heater – no gas |
| [from: Bill Fraser, United Kingdom, 20 May 2004] |
| I have struggled for three seasons trying to get my parafin Wallas cooker and heater to work with much expense and no luck. Can anyone recommend alternates (parafin/diesel) that actually work? |
|
|
| Through hull transducer mounting |
| [from: Bill Fraser, United Kingdom, 12 May 2003] |
| I have burnt out my Silva electronics with a wonderful trailing/retractable transom transducer, and am now thinking of converting to wireless Tacktick instruments. Only problem, they use the usual through-hull transducers and I hate the idea of drilling holes in my hull. Any good ideas about where/how to mount these for least trouble/easy access? |
|
|
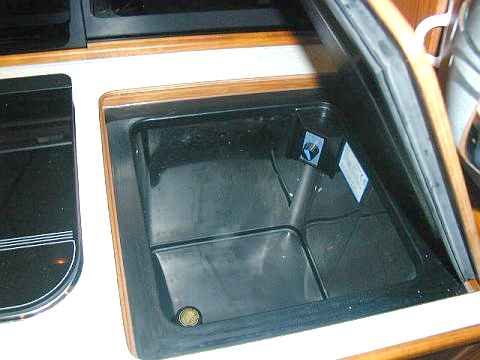
| Coolbox (ref. Tony van Wouw, see below) |
| [from: Ernst Fellner, Germany, 10 Feb 2003] |
|
Quorning-Boats hat bereits beim Bau meines DF920 die WAECO-Coolmatic Kühlbox CB-36 in den Stb. Pantry-Unterschrank perfekt eingebaut. Der Kompressor (Danfoss BD35 ) ist unter der Stb. Backskiste neben der großen Schublade installiert. Siehe Photos. Im Mittelmeer ist eine Kühlbox im Sommer unverzichtbar. Die Einschaltzeitzeit bei 30 Grad Aussentemperatur beträgt ca 30%, der mittlere Verbrauch also ca 1,1 A. |
|
Please click on any of the photos to see them enlarged! |
|
[Quorning Boats has installed the WAECO Coolmatic CB-36 at the time of construction of the boat in the starboard pantry. The compressor is under the stb. cockpit locker. next to the large drawer (see photo 3). In the Med in the summer you need a coolbox. The running time at 30 degree Celsius air temp. is approx. 30%, therefore averaging 1.1A (26Ah/jour).] |
|
|
| Cooking (how to get the Wallas working) and Cooling |
| [from: Tony van Wouw, Canada, 29 Jan 2003] |
|
In response to earlier correspondence on the Wallas cooker, it is critical that the fuel pickup does not allow any air to enter. The An alternative refrigerator location is the starboard cockpit locker. I added about 5 cm of urethane foam covered with 1 mm styrene to the sides and top of the locker. I added 7.5 cm of the same foam to the bottom underneath the locker. I then installed a Waeco/Danfoss50 kit with the compressor/condensor in the lazarette. The results were great. Run time is about 1:6 for a daily consumption of about 15 AH. All the conveniences of home with minimal weight! |
|
|
ANCHOR: |
| Swing Wing Winch as Anchor Winch! Further to the anchor fittings . . . |
| [from: Bo Wetzel, France, 14 July 2002] |
|
To Michael Platt’s question regarding the standard anchor fitting on the beam: The disadvantage seems to be that the boat is being pulled sideways towards the anchor when pulling the cable in over the anchor fitting. The advantage is one can use the swing wing winch to get the anchor in! One needs an additional opening-block (snatch-block) with snapshackle (fixed to the pushpit) to keep the cable parallel to the cabin and above the trampoline and to guide the rope onto the winch. I use as cable 5m of 8mm chain and 40m of 16mm rope. When anchored in depth of over 3m the system works fine. That means I can steer the boat (with the engine power according to wind condition) towards the anchor and winch the cable in. I know when the chain comes over the anchor fitting that it’s now only 5 more metres. P.S. Barton manufacturs a suitable snatch-block which is sold for around 60Euro by SVB (www.svb.de) |
|
|
| Further info to the bow-anchor of the DF920 |
| [from: Michael Platt, UK, 4 July 2002] |
| Thanks very much to Ernst for the details about the anchor fitting – it looks like a very good solution, and I feel must work rather better than the standard wing-mounted fitting, even though we dont really have the fore/aft mooring problem in England that Ernst mentions. Does anyone have positive or negative things to say about the standard fitting? |
|
|
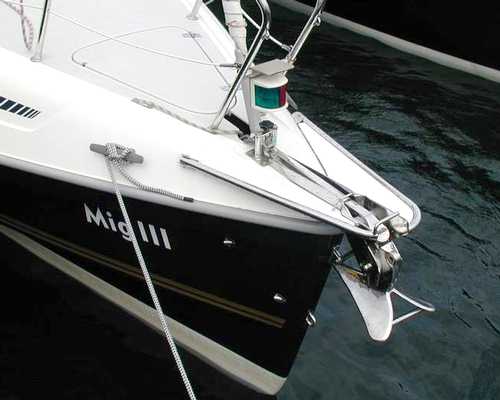
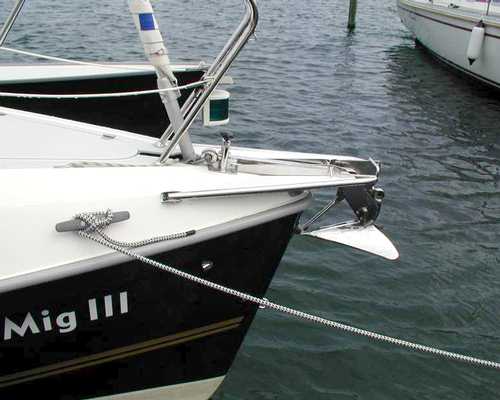
| Bow roller fitting for anchor |
| [from: Dr Ernst Fellner, Germany, 24 June 2002] |
|
Please click on any of the photos to see them enlarged! |
|
To Michael Platt’s question: This bowsprit/anchor fitting has been built by Prasolux Maritim, Solingen, Germany to my design. I started off with the standard bowsprit from Quorning for the 65m² furling spi. But I found the system cumbersome when retracting the floats and when berthing bow on. (it wasn’t easy – and safe – to enter the boat from the bow). I first bought the anchor fitting ARB-P/B550 (for Bruce/CQR anchor) from Prasolux and later made a mock-up of the whole using copper pipes. I then returned the anchor fitting to Prasolux and had the whole thing made in stainless steel. I added the infills each side of the anchor-fitting myself later. The furling spi can still be mounted and seems to work o.k. The original bowsprit fitting (see separate photo) from Quorning is used to add additional strength to the construction. The cost was approx. 1100Euro. Prasolux did an excellent job and they still have the original drawings for it. www.prasolux-online.de This winter I intend to fit a bowsprit which stores in the anchorwell and slides forward with a guide under the port side of the existing fittings. |
|
|
| Bow roller fitting for anchor |
| [from: Michael Platt, UK, 18 June 2002] |
|
I was very interested to see Ernst Fellner’s photos of his fitting for the 920. Was it custom-made or is it from standard components? It seems to be just what is needed to make both anchoring and mooring to a permanent swinging mooring a great deal simpler! [I was going to ask the same question, Bo. So, let’s hear it Ernst.] |
| Go to TOP of Page |
|
|
AUTOPILOT: |
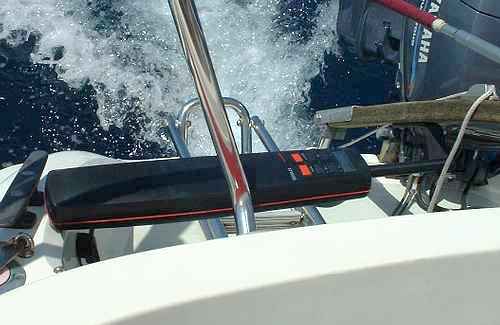
| Experience with the tiller pilot (ST2000)? |
| [from: Torleiv Holst, Norway, 29 Oct 2005] |
| I just bought a Dragonfly extreme. It will be the second Dragonfly extreme in Norway, but probably not the last. I am desperatly waiting for the autum and winter to end so the boat will be ready at Quorning Boats. In the mean time I have to take a lot of decisions about equipment etc. I wonder if someone have experience with the tiller pilot (ST2000)? I saw the comments on how to fix the pilot, but I wonder how it works under sail. Can you only use it in very flat water and very little wind or is it realy a helping hand under stronger wind. Or maybe is it enough just to use a rubber band when I need to let go of the tiller. |
|
|
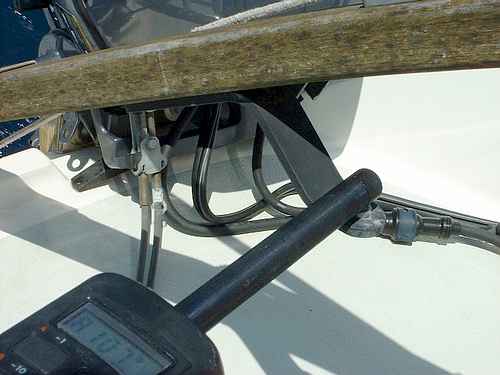
| Tiller Pilot – This is how it’s done |
| [from: Bo Wetzel, France, 20 July 2002] |
|
Please click on any of the photos to see them enlarged! |
|
I’ve a ST1000 which is not fast enough, so the ST2000 is a better choice! The bracket underneath the tiller spaces the rod connector approx. 100mm beneath the tiller. No pushrod extension is needed. I don’t know whether the place for the socket is premoulded in your cockpit coaming of the bathing platform otherwise you can see from the photo where it should go. Sorry, I don’t know the part numbers. |
|
|
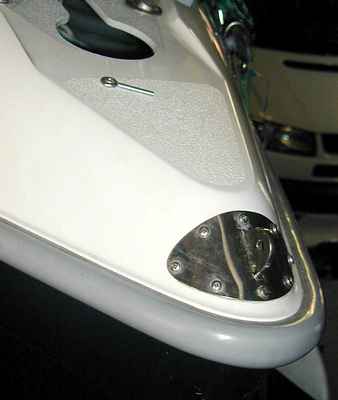
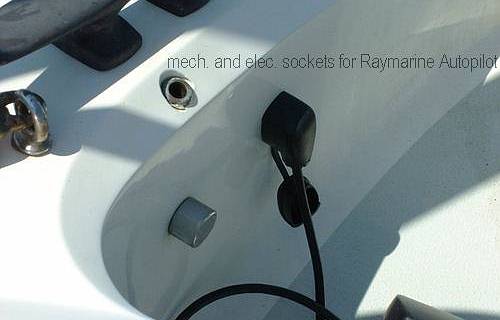
| How to fix a Raytheon ST2000 tiller pilot ? |
| [from: Michael Platt, UK, 14 July 2001] |
| Can anyone advise on the right combination of brackets/sockets/pushrod extensions etc needed to mount a Raytheon ST2000 tiller pilot on a DF920, and the recommended locations for them? |
| Go to TOP of Page |
|
|
WINCHES: |
| Go to TOP of Page |